前言
動畫在一個應用程式當中或許不是必要的,但對於整個使用者介面往往可以造成更生動的效果,提升更佳的使用者操作經驗跟感覺。Android提供了三種動畫架構,Drawable Animation、View Animation和Property Animation可以用來處理旋轉、淡入淡出、放大縮小及移動等等這些效果,只要可以善用這些架構,你可以不需要自己撰寫動畫演算法或是處理圖形演算就可以做出非常炫麗的效果。
所有架構的動畫都支援使用XML來建立或是直接此用程式碼來建立這兩種方式。
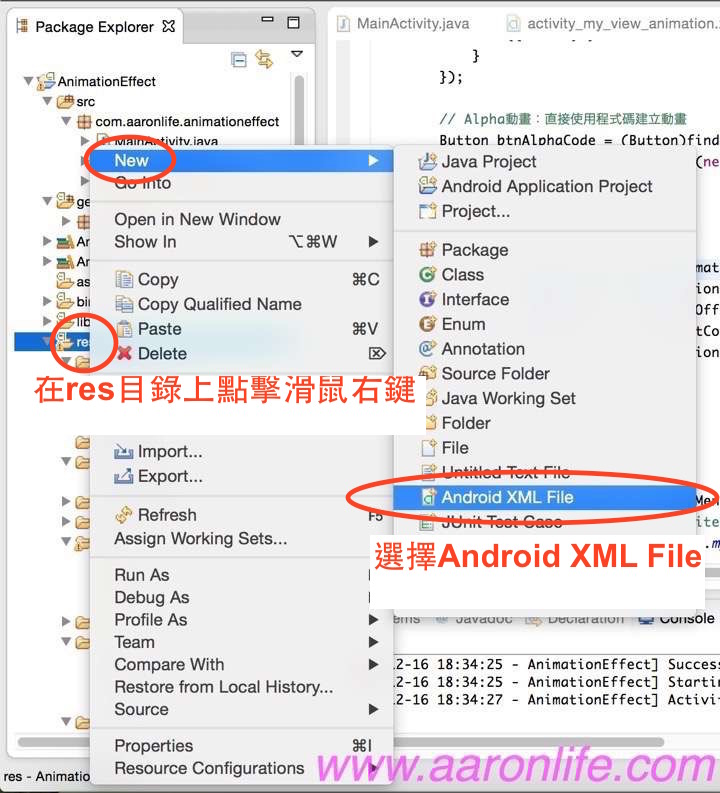
Drawable Animation
又稱為Frame Animation(在Android 2.0以前就是這麼稱呼的),和電視上卡通或動漫原理相同,利用一張張圖片的快速切換來造成影像的改變而達到動畫的效果。例如:一般動漫每一秒鐘的畫面是由24張靜態圖片快速切換組成的。
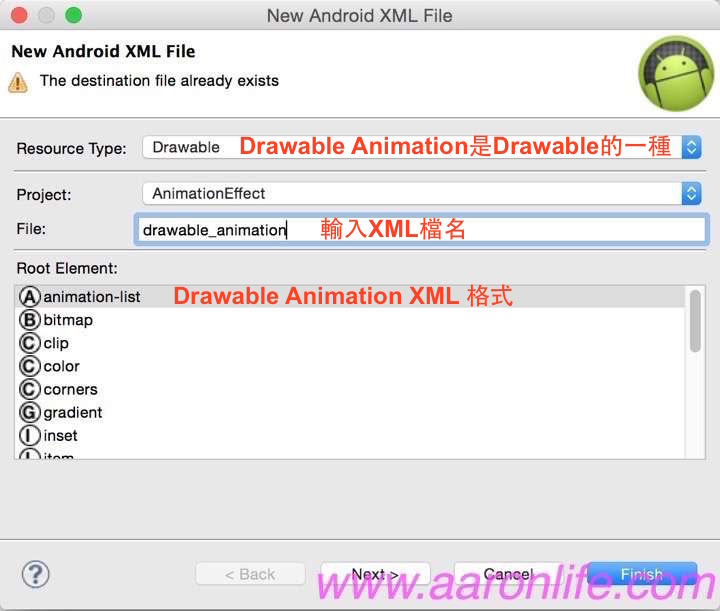
使用XML建立
<?xml version="1.0" encoding="utf-8"?>
<animation-list xmlns:android="http://schemas.android.com/apk/res/android"
    android:oneshot="false">
    <item android:drawable="@drawable/expl1" android:duration="50" />
    <item android:drawable="@drawable/expl2" android:duration="50" />
    <item android:drawable="@drawable/expl3" android:duration="50" />
    <item android:drawable="@drawable/expl4" android:duration="50" />
    <item android:drawable="@drawable/expl5" android:duration="50" />
    <item android:drawable="@drawable/expl6" android:duration="50" />
    <item android:drawable="@drawable/expl7" android:duration="50" />
    <item android:drawable="@drawable/expl8" android:duration="50" />
    <item android:drawable="@drawable/expl9" android:duration="50" />
    <item android:drawable="@drawable/expl10" android:duration="50" />
    <item android:drawable="@drawable/expl11" android:duration="50" />
    <item android:drawable="@drawable/expl12" android:duration="50" />
    <item android:drawable="@drawable/expl13" android:duration="50" />
    <item android:drawable="@drawable/expl14" android:duration="50" />
    <item android:drawable="@drawable/expl15" android:duration="50" />
    <item android:drawable="@drawable/expl16" android:duration="50" />
    <item android:drawable="@drawable/expl17" android:duration="50" />
</animation-list>
說明:
animation-list的android:oneshot屬性設定是否只要播放一次,false代表循環播放。- android:drawable屬性:設定要播放的圖片。
- android:duration屬性:每個畫面要停留的時間,單位為毫秒,範例為50毫秒。
- 播放圖片的順序為XML檔中由上到下的圖片順序。
ImageView元素:
<ImageView
    android:id="@+id/imgView"
    android:layout_width="wrap_content"
    android:layout_height="wrap_content"
    />
最後,到Activity的程式碼onCreate()方法內加上:
@Override
protected void onCreate(Bundle savedInstanceState)
{
    super.onCreate(savedInstanceState);
    setContentView(R.layout.activity_my_drawable_animation);

    // 從XML載入Drawable Animation
    AnimationDrawable ani = (AnimationDrawable)getResources().getDrawable(R.drawable.drawable_animation);
    ImageView imgView = (ImageView)findViewById(R.id.imgView);
    imgView.setImageDrawable(ani);
    ani.start();
}
執行程式,就可以在畫面上看到連續播放的Frame動畫效果。
說明如下:- 透過
getResources().getDrawable()方法從drawable資源當中取出畫面清單資源,然後存到AnimationDrawable宣告的物件變數當中。 - 將XML版面中的
ImageView關聯到程式碼中。 - 呼叫
ImageView的setImageDrawable()方法將AnimationDrawable物件設定給ImageView。 - 呼叫動畫物件
AnimationDrawable.start()方法來開始播放動畫。
直接用程式碼建立
在Activity.onCreate()方法內加入程式碼如下:
@Override
protected void onCreate(Bundle savedInstanceState)
{
    super.onCreate(savedInstanceState);
    setContentView(R.layout.activity_my_drawable_animation);

    // 直接用程式碼建立Drawable Animation
    AnimationDrawable ani2 = new AnimationDrawable();
    ani2.addFrame(getResources().getDrawable(R.drawable.expl1), 50); // 每個frame停留50毫秒
    ani2.addFrame(getResources().getDrawable(R.drawable.expl2), 50); // 每個frame停留50毫秒
    ani2.addFrame(getResources().getDrawable(R.drawable.expl3), 50); // 每個frame停留50毫秒
    ani2.addFrame(getResources().getDrawable(R.drawable.expl4), 50); // 每個frame停留50毫秒
    ani2.addFrame(getResources().getDrawable(R.drawable.expl5), 50); // 每個frame停留50毫秒
    ani2.addFrame(getResources().getDrawable(R.drawable.expl6), 50); // 每個frame停留50毫秒
    ani2.addFrame(getResources().getDrawable(R.drawable.expl7), 50); // 每個frame停留50毫秒
    ani2.addFrame(getResources().getDrawable(R.drawable.expl8), 50); // 每個frame停留50毫秒
    ani2.addFrame(getResources().getDrawable(R.drawable.expl9), 50); // 每個frame停留50毫秒
    ani2.addFrame(getResources().getDrawable(R.drawable.expl10), 50); // 每個frame停留50毫秒
    ani2.addFrame(getResources().getDrawable(R.drawable.expl11), 50); // 每個frame停留50毫秒
    ani2.addFrame(getResources().getDrawable(R.drawable.expl12), 50); // 每個frame停留50毫秒
    ani2.addFrame(getResources().getDrawable(R.drawable.expl13), 50); // 每個frame停留50毫秒
    ani2.addFrame(getResources().getDrawable(R.drawable.expl14), 50); // 每個frame停留50毫秒
    ani2.addFrame(getResources().getDrawable(R.drawable.expl15), 50); // 每個frame停留50毫秒
    ani2.addFrame(getResources().getDrawable(R.drawable.expl16), 50); // 每個frame停留50毫秒
    ani2.addFrame(getResources().getDrawable(R.drawable.expl17), 50); // 每個frame停留50毫秒
    ani2.setOneShot(false); // false=重複播放, true=只播放一次
    ImageView imgView2 = (ImageView)findViewById(R.id.imgView2);
    imgView2.setImageDrawable(ani2);
    ani2.start();

    // 你還可以使用下面方法:
    // ani.setAlpha(alpha);  // 設定透明度
    // ani.stop();           // 停止動畫
    // ani.isRunning();      // 動畫是否播放中
}
說明:
- 和從XML載入不樣的是這裡要直接透過Java
new語法來建立AnimationDrawable物件。 - 接著透過呼叫
AnimationDrawable.addFrame()方法透過圖片ID來加入每一張圖片資源。 - 呼叫
AnimationDrawable.setOnShot(false)設定成循環播放。 - 最後一樣是呼叫
start()方法開始播放。
AnimationDrawable裏還有幾個常用的方法:
| 方法名稱 | 描述 |
|---|---|
| void setAlpha(int alpha) | 範圍為0~255,0為透明,255為不透明。 |
| void stop() | 停止播放動畫。 |
| boolean isRunning() | 動畫是否在播放中。 |
-
View Animation
又稱為Tween Animation(在Android 2.0以前就是這麼稱呼的),tween也就是between的意思,透過指定開始和結束的兩個狀態,然後透過演算法對影像進行即時的運算處理,來產生中間變化的過程,來讓使用者看到完整的動畫效果;支援的動畫有透明度、放大縮小、旋轉及移動四種。
View Animation架構提供了AlphaAnimation、ScaleAnimation、RotateAnimation和TranslateAnimation四種類別來分別建立透明、縮放、旋轉和移動四種動畫效果,並且更進一步的提供了AnimationSet來將多個動畫物件組合成更複雜的動畫效果。
使用XML建立
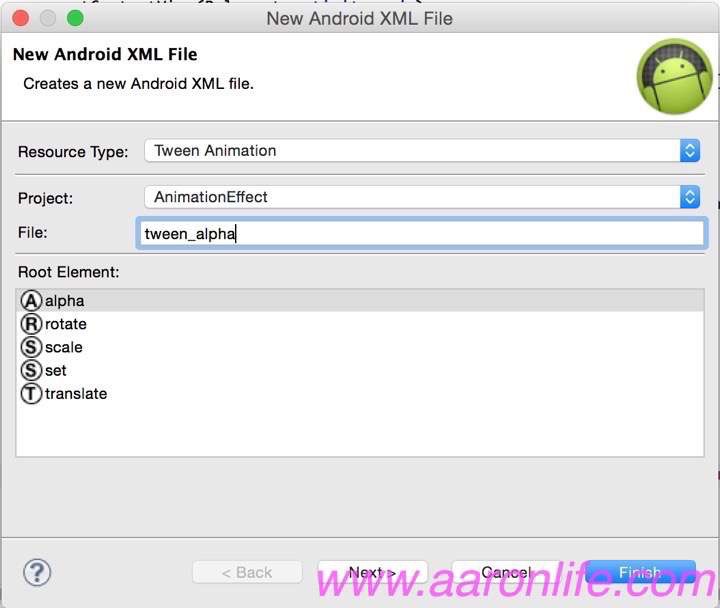
Resource Type選擇『Tween Animation』,XML檔名只能為小寫英文、數字跟底線的組合,Root Element為alpha=透明動畫,scale=縮放動畫,rotate=旋轉動畫,translate=移動動畫。 建立四個XML如下(建立出的XML檔案必須放在專案下
res/anim/tween_alpha.xml:res/anim目錄下):<?xml version="1.0" encoding="utf-8"?> <alpha xmlns:android="http://schemas.android.com/apk/res/android" android:fromAlpha="0.0" android:toAlpha="1.0" android:duration="2000"> </alpha>alpha屬性說明:android:fromAlpha 動畫開始時的透明度,範圍為0~1浮點數,0為透明,1為不透明。 android:toAlpha 動畫結束時的透明度,範圍為0~1浮點數,0為透明,1為不透明。 android:duration 從開始到結束要持續的時間,單位為毫秒。該屬性必須存在。
res/anim/tween_scale.xml:<?xml version="1.0" encoding="utf-8"?> <scale xmlns:android="http://schemas.android.com/apk/res/android" android:fromXScale="0.0" android:toXScale="1.0" android:fromYScale="0.0" android:toYScale="1.0" android:pivotX="50%" android:pivotY="50%" android:duration="2000"> </scale>scale屬性說明:android:fromXScale 寬度的起始倍率,1為原始寬度,小於1為縮小,大於1為放大。 android:toXScale 寬度的結束倍率,1為原始寬度,小於1為縮小,大於1為放大。 android:fromYScale 高度的起始倍率,1為原始寬度,小於1為縮小,大於1為放大。 android:toYScale 高度的結束倍率,1為原始寬度,小於1為縮小,大於1為放大。 android:pivotX 元件變化時的X原點,可用百分比,50%代表中心點。 android:pivotY 元件變化時的Y原點,可用百分比,50%代表中心點。 android:duration 從開始到結束要持續的時間,單位為毫秒。該屬性必須存在。
res/anim/tween_rotate.xml:<?xml version="1.0" encoding="utf-8"?> <rotate xmlns:android="http://schemas.android.com/apk/res/android" android:fromDegrees="0" android:toDegrees="360" android:pivotX="50%" android:pivotY="50%" android:duration="2000"> </rotate>rotate屬性說明:android:fromDegree 動畫開始時的角度,0為原始角度,180為轉半圈,360則等同於0度。 android:toDegree 動畫結束時的角度,0為原始角度,180為轉半圈,360則等同於0度。 android:pivotX 元件變化時的X原點,可用百分比,50%代表中心點。 android:pivotY 元件變化時的Y原點,可用百分比,50%代表中心點。 android:duration 從開始到結束要持續的時間,單位為毫秒。該屬性必須存在。
res/anim/tween_translate.xml:<?xml version="1.0" encoding="utf-8"?> <translate xmlns:android="http://schemas.android.com/apk/res/android" android:fromXDelta="-300" android:toXDelta="0" android:fromYDelta="0" android:toYDelta="0" android:duration="2000"> </translate>translate屬性說明:android:fromXDelta X座標起始位置,為相對於原始X座標的偏移植,大於0代表往右,小於0為往左,單位為像素。 android:toXDelta X座標結束位置,為相對於原始X座標的偏移植,大於0代表往右,小於0為往左,單位為像素。 android:fromYDelta Y座標起始位置,為相對於原始Y座標的偏移植,大於0代表往下,小於0為往上,單位為像素。 android:toYDelta Y座標起始位置,為相對於原始Y座標的偏移植,大於0代表往下,小於0為往上,單位為像素。 android:duration 從開始到結束要持續的時間,單位為毫秒。該屬性必須存在。
四種元件還有一些常用的共通屬性可以設定:
android:interpolator的值有以下幾個:android:interpolator 定義一個動畫的變化率(the rate of change)。使得基本的動畫效果(Alpha, scale, translate, rotate)得以加速,減速,重複等。也就是說,動畫的進度使用Interpolator控制。Interpolator定義了動畫的變化速度,可以實現勻速、正加速、負加速、無規則變加速等。 android:fillAfter 動畫結束後要不會恢復原始狀態,false=恢復原始狀態,true=保持結束時的動畫效果。 android:startOffset 動畫開始後經過多久再開始進行動畫的播放,時間單位為毫秒。 android:repeatCount 動畫重複次數,Animation.INFINITE=無限次循環播放。 android:repeatMode 必須為android:repeatCount的值大於0或為infinite才有效;動畫重複的模式,『restart』重新開始,『reverse』反過來播放。
在XML內使用的範例如下:類別名稱 XML屬性值 描述 AccelerateDecelerateInterpolator @android:anim/accelerate_decelerate_interpolator 在動畫開始與介紹的地方速率改變比較慢,在中間的時侯加速。 AccelerateInterpolator @android:anim/accelerate_interpolator 在動畫開始的地方速率改變比較慢,然後開始加速。 AnticipateInterpolator @android:anim/anticipate_interpolator AnticipateOvershootInterpolator @android:anim/anticipate_overshoot_interpolator BounceInterpolatore @android:anim/bounce_interpolator CycleInterpolator @android:anim/cycle_interpolator 動畫迴圈播放特定的次數,速率改變沿著正弦曲線。 DecelerateInterpolator @android:anim/decelerate_interpolator DecelerateInterpolator LinearInterpolator @android:anim/linear_interpolator 在動畫的以均勻的速率改變 OvershootInterpolator @android:anim/overshoot_interpolator android:interpolator="@android:anim/accelerate_interpolator"
接著在Layout中建立四個按鈕:<Button android:id="@+id/btnAlphaXml" android:layout_width="wrap_content" android:layout_height="wrap_content" android:background="#0000FF" android:text="Alpha XML" /> <Button android:id="@+id/btnScaleXml" android:layout_width="wrap_content" android:layout_height="wrap_content" android:background="#007000" android:text="Scale XML" /> <Button android:id="@+id/btnRotateXml" android:layout_width="wrap_content" android:layout_height="wrap_content" android:background="#A0A000" android:text="Rotate XML" /> <Button android:id="@+id/btnTransXml" android:layout_width="wrap_content" android:layout_height="wrap_content" android:background="#A000A0" android:text="Trans XML" />最後,到Activity原始碼內加入下面程式碼:@Override protected void onCreate(Bundle savedInstanceState) { super.onCreate(savedInstanceState); setContentView(R.layout.activity_my_view_animation); // Alpha動畫:從XML中載入動畫,在點擊按鈕後播放 Button btnAlphaXml = (Button)findViewById(R.id.btnAlphaXml); btnAlphaXml.setOnClickListener(new OnClickListener() { @Override public void onClick(View v) { ((Button)v).startAnimation(AnimationUtils.loadAnimation(MyViewAnimation.this, R.anim.tween_alpha)); } }); // Scale動畫:從XML中載入動畫,在點擊按鈕後播放 Button btnScaleXml = (Button)findViewById(R.id.btnScaleXml); btnScaleXml.setOnClickListener(new OnClickListener() { @Override public void onClick(View v) { ((Button)v).startAnimation(AnimationUtils.loadAnimation(MyViewAnimation.this, R.anim.tween_scale)); } }); // Rotate動畫:從XML中載入動畫,在點擊按鈕後播放 Button btnRotateXml = (Button)findViewById(R.id.btnRotateXml); btnRotateXml.setOnClickListener(new OnClickListener() { @Override public void onClick(View v) { ((Button)v).startAnimation(AnimationUtils.loadAnimation(MyViewAnimation.this, R.anim.tween_rotate)); } }); // Translate動畫:從XML中載入動畫,在點擊按鈕後播放 Button btnTransXml = (Button)findViewById(R.id.btnTransXml); btnTransXml.setOnClickListener(new OnClickListener() { @Override public void onClick(View v) { ((Button)v).startAnimation(AnimationUtils.loadAnimation(MyViewAnimation.this, R.anim.tween_translate)); } }); }透過呼叫
AnimationUtils.loadAnimation()方法來載入XML資源,第一個參數為應用程式的context,第二個參數則為動畫檔的資源ID。接著在元件物件呼叫startAnimation()方法,並將剛剛載入的Animation物件傳遞進去就會開始動畫播放了。直接用程式碼建立
接著在Layout中建立四個按鈕:<Button android:id="@+id/btnAlphaCode" android:layout_width="wrap_content" android:layout_height="wrap_content" android:background="#0000FF" android:text="Alpha Code" /> <Button android:id="@+id/btnScaleCode" android:layout_width="wrap_content" android:layout_height="wrap_content" android:background="#007000" android:text="Scale Code" /> <Button android:id="@+id/btnRotateCode" android:layout_width="wrap_content" android:layout_height="wrap_content" android:background="#A0A000" android:text="Rotate Code" /> <Button android:id="@+id/btnTransCode" android:layout_width="wrap_content" android:layout_height="wrap_content" android:background="#A000A0" android:text="Trans Code" />在Activity.onCreate()方法內加入程式碼如下:@Override protected void onCreate(Bundle savedInstanceState) { super.onCreate(savedInstanceState); setContentView(R.layout.activity_my_view_animation); // Alpha動畫:直接使用程式碼建立動畫 Button btnAlphaCode = (Button)findViewById(R.id.btnAlphaCode); btnAlphaCode.setOnClickListener(new OnClickListener() { @Override public void onClick(View v) { // 範圍只能在0.0全透明1.0完全不透明之間的浮點數 AlphaAnimation alphaAnimation = new AlphaAnimation(0.0F, // 動畫開始時的透明度,範圍為0~1浮點數,0為透明,1為不透明 1.0F); // 動畫結束時的透明度,範圍為0~1浮點數,0為透明,1為不透明 alphaAnimation.setDuration(2000); // 從開始到結束要持續的時間,單位為毫秒,必須設定 ((Button)v).startAnimation(alphaAnimation); } }); // Scale動畫:直接從程式碼建立,在點擊按鈕後播放 Button btnScaleCode = (Button)findViewById(R.id.btnScaleCode); btnScaleCode.setOnClickListener(new OnClickListener() { @Override public void onClick(View v) { ScaleAnimation scaleAnimation = new ScaleAnimation(0.0F, // 寬度的起始倍率,1為原始寬度,小於1為縮小,大於1為放大 1.0F, // 寬度的結束倍率,1為原始寬度,小於1為縮小,大於1為放大 0.0F, // 高度的起始倍率,1為原始寬度,小於1為縮小,大於1為放大 1.0F, // 高度的結束倍率,1為原始寬度,小於1為縮小,大於1為放大 Animation.RELATIVE_TO_SELF, // 元件變化X原點相對關係 0.5F, // 元件變化時的X原點,0.5為相對於上一個參數的中心點 Animation.RELATIVE_TO_SELF, // 元件變化Y原點相對關係 0.5F); // 元件變化時的Y原點,0.5為相對於上一個參數的中心點 scaleAnimation.setDuration(2000); // 從開始到結束要持續的時間,單位為毫秒,必須設定 ((Button)v).startAnimation(scaleAnimation); } }); // Rotate動畫:直接由程式碼建立,在點擊按鈕後播放 Button btnRotateCode = (Button)findViewById(R.id.btnRotateCode); btnRotateCode.setOnClickListener(new OnClickListener() { @Override public void onClick(View v) { RotateAnimation rotateAnimation = new RotateAnimation(0, // 動畫開始時的角度,0為原始角度,180為轉半圈,360則等同於0度 360, // 動畫結束時的角度,0為原始角度,180為轉半圈,360則等同於0度 Animation.RELATIVE_TO_SELF, // 元件變化X原點相對關係 0.5F, // 元件變化時的X原點,0.5為相對於上一個參數的中心 Animation.RELATIVE_TO_SELF, // 元件變化Y原點相對關係 0.5F); // 元件變化時的Y原點,0.5為相對於上一個參數的中心 rotateAnimation.setDuration(2000); // 從開始到結束要持續的時間,單位為毫秒,必須設定 ((Button)v).startAnimation(rotateAnimation); } }); // Translate動畫:直接由程式碼建立,在點擊按鈕後播放 Button btnTransCode = (Button)findViewById(R.id.btnTransCode); btnTransCode.setOnClickListener(new OnClickListener() { @Override public void onClick(View v) { TranslateAnimation translateAnimation = new TranslateAnimation(500, // X座標起始位置,為相對於原始X座標的偏移植,大於0代表往右,小於0為往左,單位為像素 0, // X座標結束位置,為相對於原始X座標的偏移植,大於0代表往右,小於0為往左,單位為像素 0, // Y座標起始位置,為相對於原始Y座標的偏移植,大於0代表往下,小於0為往上,單位為像素 0); // Y座標起始位置,為相對於原始Y座標的偏移植,大於0代表往下,小於0為往上,單位為像素 translateAnimation.setDuration(2000); // 從開始到結束要持續的時間,單位為毫秒,必須設定 ((Button)v).startAnimation(translateAnimation); } }); }直接透過建立動畫物件(AlphaAnimation、ScaleAnimation、RotateAnimation和TranslateAnimation)的方式來建立動畫,建構式內傳入該效果需要的參數,參數說明可參考程式碼註解,最後都是呼叫要產生動畫效果的元件的
startAnimation()方法來開始播放動畫。AnimationSet - 整合多個View Animation動畫效果
使用XML建立
在建立View Animation XML資源檔一樣的方式,在root element選擇set選項,然後建立檔案如下,在
res/anim/tween_set.xmlset根元素下,你可以不限制的放入alpha、scale、rotate和translate元素。<set xmlns:android="http://schemas.android.com/apk/res/android"> <alpha android:fromAlpha="0.0" android:toAlpha="1.0" android:duration="2000"> </alpha> <scale android:fromXScale="0.0" android:toXScale="1.0" android:fromYScale="0.0" android:toYScale="1.0" android:pivotX="50%" android:pivotY="50%" android:duration="2000"> </scale> <rotate android:fromDegrees="0" android:toDegrees="360" android:pivotX="50%" android:pivotY="50%" android:duration="2000"> </rotate> <translate android:fromXDelta="-500" android:toXDelta="0" android:fromYDelta="0" android:toYDelta="0" android:duration="2000"> </translate> </set>並在版面中新增一個Button元件:<Button android:id="@+id/btnSetXml" android:layout_width="wrap_content" android:layout_height="wrap_content" android:layout_weight="1" android:background="#00A0A0" android:text="Set XML" />接著,在程式碼當中載入AnimationSet XML動畫資源:@Override protected void onCreate(Bundle savedInstanceState) { // Set動畫(同時套用多個動畫的組合):從XML中載入動畫,在點擊按鈕後播放 Button btnSetXml = (Button)findViewById(R.id.btnSetXml); btnSetXml.setOnClickListener(new OnClickListener() { @Override public void onClick(View v) { ((Button)v).startAnimation(AnimationUtils.loadAnimation(MyViewAnimation.this, R.anim.tween_set)); } }); }直接用程式碼建立
先加入新的按鈕:<Button android:id="@+id/btnCodeXml" android:layout_width="wrap_content" android:layout_height="wrap_content" android:layout_weight="1" android:background="#00A0A0" android:text="Code XML" />接下來,加入程式碼如下:@Override protected void onCreate(Bundle savedInstanceState) { // Set動畫(同時套用多個動畫的組合):直接由程式碼建立,在點擊按鈕後播放 Button btnSetCode = (Button)findViewById(R.id.btnSetCode); btnSetCode.setOnClickListener(new OnClickListener() { @Override public void onClick(View v) { // 建立透明動畫 AlphaAnimation alphaAnimation = new AlphaAnimation(0.0F, 1.0F); alphaAnimation.setDuration(2000); // 建立縮放動畫 ScaleAnimation scaleAnimation = new ScaleAnimation(0.0F, 1.0F, 0.0F, 1.0F, Animation.RELATIVE_TO_SELF, 0.5F, Animation.RELATIVE_TO_SELF, 0.5F); scaleAnimation.setDuration(2000); // 建立旋轉動畫 RotateAnimation rotateAnimation = new RotateAnimation(0, 360, Animation.RELATIVE_TO_SELF, 0.5F, Animation.RELATIVE_TO_SELF, 0.5F); rotateAnimation.setDuration(2000); // 建立移動動畫 TranslateAnimation translateAnimation = new TranslateAnimation(500, 0, 0, 0); translateAnimation.setDuration(2000); AnimationSet animationSet = new AnimationSet(false); // 直接建立AnimationSet物件 animationSet.addAnimation(alphaAnimation); animationSet.addAnimation(scaleAnimation); animationSet.addAnimation(rotateAnimation); animationSet.addAnimation(translateAnimation); ((Button)v).startAnimation(animationSet); } }); }透過
AnimationSet.addAnimation()方法來加入想要合併播放的動畫物件。使用ImageSwitcher來播放In跟Out動畫
一般元件的動畫都只能做到元件出現時播放動畫(In動畫),當元件消失或移除時則無法設定動畫,如果我們想做到元件出現(In)時播放一個旋轉進入的動畫,在元件移除(Out)時,播放一個旋轉離開的動畫,則可以透過
ImageSwitcher元件。ImageSwitcher同樣可以透過XML或是程式碼的方式來建立動畫,此處只示範直接在程式碼建立動畫。
首先,在版面裡加入一個Button用來啟動動畫用和ImageSwitcher元素:<Button android:id="@+id/btnInOut" android:layout_width="wrap_content" android:layout_height="wrap_content" android:layout_weight="1" android:background="#A04040" android:text="In & Out" /> <ImageSwitcher android:id="@+id/imgSwitch" android:layout_width="wrap_content" android:layout_height="wrap_content">接著,初始化ImageSwitcher元件,ImageSwitcher都必須實現ViewFactory物件,在ViewFactory.makeView()方法中建立自己的ImageView及其屬性:// 初始化ImageSwitcher ImageSwitcher imgSwitch = (ImageSwitcher)findViewById(R.id.imgSwitch); imgSwitch.setFactory(new ViewFactory() { @Override public View makeView() { ImageView v = new ImageView(MyViewAnimation.this); v.setLayoutParams(new ImageSwitcher.LayoutParams(LayoutParams.MATCH_PARENT, LayoutParams.MATCH_PARENT)); return v; } });建立動畫過程和上面相同,在這裡我們載入了上面的tween_set組合動畫來當成元件出現(In)時的動畫,而再用程式碼建立了一組AnimationSet動畫當成元件消失(Out)動畫。透過
ImageSwitcher.setInAnimation()方法設定元件出現時動畫,ImageSwitcher.setOutAnimation()方法設定元件消失時動畫。// 透過ImageSwitcher的setInAnimation和setOutAnimation設定開始和結束動畫 Button btnInOut = (Button)findViewById(R.id.btnInOut); btnInOut.setOnClickListener(new OnClickListener() { @Override public void onClick(View v) { ((ImageSwitcher)findViewById(R.id.imgSwitch)).setInAnimation(AnimationUtils.loadAnimation(MyViewAnimation.this, R.anim.tween_set)); // 建立透明動畫 AlphaAnimation alphaAnimation = new AlphaAnimation(1.0F, 0.0F); // 範圍只能在0.0全透明1.0完全不透明之間的浮點數 alphaAnimation.setDuration(2000); // 建立縮放動畫 ScaleAnimation scaleAnimation = new ScaleAnimation(1.0F, 0.0F, 1.0F, 0.0F, Animation.RELATIVE_TO_SELF, 0.5F, Animation.RELATIVE_TO_SELF, 0.5F); scaleAnimation.setDuration(2000); // 建立旋轉動畫 RotateAnimation rotateAnimation = new RotateAnimation(0, 360, Animation.RELATIVE_TO_SELF, 0.5F, Animation.RELATIVE_TO_SELF, 0.5F); rotateAnimation.setDuration(2000); // 建立移動動畫 TranslateAnimation translateAnimation = new TranslateAnimation(0, 500, 0, 0); translateAnimation.setDuration(2000); AnimationSet animationSet = new AnimationSet(false); animationSet.addAnimation(alphaAnimation); animationSet.addAnimation(scaleAnimation); animationSet.addAnimation(rotateAnimation); animationSet.addAnimation(translateAnimation); ((ImageSwitcher)findViewById(R.id.imgSwitch)).setOutAnimation(animationSet); // 換圖片 switch(imageIndex) { case 0: ((ImageSwitcher)findViewById(R.id.imgSwitch)).setImageResource(R.drawable.img2); imageIndex = 1; break; case 1: ((ImageSwitcher)findViewById(R.id.imgSwitch)).setImageResource(R.drawable.img3); imageIndex = 2; break; case 2: ((ImageSwitcher)findViewById(R.id.imgSwitch)).setImageResource(R.drawable.img); imageIndex = 0; break; } } });View Animation 動畫傾聽器
我們可以透過設定AnimationListener動畫傾聽器給動畫用來得到動畫目前播放狀態,以做到其它更多事情,如:播放下一個動畫。
<Button
    android:id="@+id/btnListener"
    android:layout_width="wrap_content"
    android:layout_height="wrap_content"
    android:layout_weight="1"
    android:background="#4040A0"
    android:text="Listener" />
// 使用動畫傾聽器 final Button btnListener = (Button)findViewById(R.id.btnListener); final RotateAnimation rotateAnimation = new RotateAnimation(0, 360, Animation.RELATIVE_TO_SELF, 0.5F, Animation.RELATIVE_TO_SELF, 0.5F); rotateAnimation.setDuration(2000); // 動畫會持續2秒鐘 rotateAnimation.setInterpolator(this, interpolator.anticipate_overshoot); // 在動畫過程當中加入其它效果 rotateAnimation.setRepeatCount(3); // 重複三次 rotateAnimation.setStartOffset(2000); // 2秒後才開始播動畫 // 建立動畫傾聽器並設定給rotateAnimation rotateAnimation.setAnimationListener(new AnimationListener() { int repeatCount = 0; // 動畫開始時會收到 @Override public void onAnimationStart(Animation animation) { btnListener.setText("Start"); } // 重複時會收到 @Override public void onAnimationRepeat(Animation animation) { btnListener.setText("Repeat: " + ++repeatCount); } // 動畫最後停止時會收到 @Override public void onAnimationEnd(Animation animation) { btnListener.setText("End"); // 結束後可以接其它動畫(例如讓其它元件動一下) ((Button)findViewById(R.id.btnAlphaCode)).startAnimation(AnimationUtils.loadAnimation(MyViewAnimation.this, R.anim.tween_alpha)); ((Button)findViewById(R.id.btnScaleXml)).startAnimation(AnimationUtils.loadAnimation(MyViewAnimation.this, R.anim.tween_scale)); ((Button)findViewById(R.id.btnRotateCode)).startAnimation(AnimationUtils.loadAnimation(MyViewAnimation.this, R.anim.tween_rotate)); ((Button)findViewById(R.id.btnTransXml)).startAnimation(AnimationUtils.loadAnimation(MyViewAnimation.this, R.anim.tween_translate)); ((Button)findViewById(R.id.btnSetCode)).startAnimation(AnimationUtils.loadAnimation(MyViewAnimation.this, R.anim.tween_set)); } }); btnListener.setOnClickListener(new OnClickListener() { @Override public void onClick(View v) { ((Button)v).startAnimation(rotateAnimation); } });Property Animation
Android 3.0之後提供的新動畫架構,用來加強原有的動畫架構,也因此可以支援原來的動畫效果。Property Animation將動畫的動作拆分成更多種類。
例如:- 原有的View Animation動畫只是讓元件的外觀改變,而元件實際位置是不變的,但Property Animation則是讓該元件隨著動畫的狀態或位置跟著做改變,如當你使用View Animation移動一個按鈕的時候,雖然按鈕已經被移動了,但是當你要點擊按鈕的時候,你必須點擊原來的位置才會有效,而Property Animation則是隨著按鈕的移動,你必須去點擊目前按鈕的最新位置才有效。
- 在原來的動畫架構沒辦法做到改變顏色或顏色強弱的動畫,因為顏色值並沒有遞增獲遞減的規則;而新的Property Animation可以做到。
在Property Animation的架構下,所有的動畫類型(如:透明、旋轉、縮放、移動和其它),透過XML建立的話,都是使用
objectAnimation元素,而在程式碼內都是使用ObjectAnimator類別來建立;而且,不管是透過XML或是直接從程式碼建立Property Animation動畫,都必須有propertyName屬性,該屬性值用來指定你的ObjectAnimator要建立的動畫類型,其值如下表:translationX 移動元件的X軸位置。 translationY 移動元件的Y軸位置。 rotation 旋轉元件(2D) rotationX 旋轉元件的X軸(3D) rotationY 旋轉元件的Y軸(3D) scaleX 縮放元件的寬 scaleY 縮放元件的高 pivotX 動畫元件的動作要生效的起始座標X pivotY 動畫元件的動作要生效的起始座標Y x 元件的X座標 y 元件的Y座標 alpha 透明度 因為Property Animation將所有的動作拆分得更細也更單純,所以像你打算建立一個可以縮放一個元件的時候,如果你打算寬度的縮放比為0~1,且高度也是0~1的縮放比,你必須使用兩個ObjectAnimator
請注意,ObjectAnimator這個字的後面是Animator,而不是Animation;在Property Animation架構下,XML元素及類別名稱大都使用Animator而非Animation。
使用XML建立
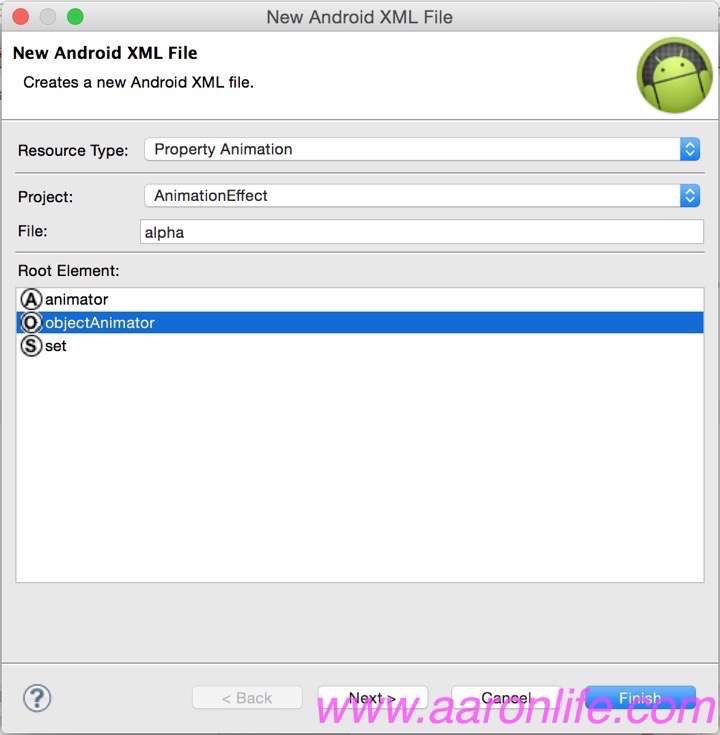
Resource Type選擇『Property Animation』,Root Element為ObjectAnimator。 建立好的XML必須存放在
res/animator/alpha.xmlres/animator目錄當中。<?xml version="1.0" encoding="utf-8"?> <objectAnimator xmlns:android="http://schemas.android.com/apk/res/android" android:propertyName="alpha" android:valueFrom="0" android:valueTo="1" android:duration="2000"> </objectAnimator>res/animator/scale.xml<?xml version="1.0" encoding="utf-8"?> <set xmlns:android="http://schemas.android.com/apk/res/android" > <objectAnimator android:propertyName="scaleX" android:valueFrom="0" android:valueTo="1" android:duration="2000"> </objectAnimator> <objectAnimator android:propertyName="scaleY" android:valueFrom="0" android:valueTo="1" android:duration="2000"> </objectAnimator> </set>res/animator/rotate.xml<?xml version="1.0" encoding="utf-8"?> <objectAnimator xmlns:android="http://schemas.android.com/apk/res/android" android:propertyName="rotation" android:valueFrom="0" android:valueTo="360" android:duration="2000"> </objectAnimator>res/animator/translate.xml<?xml version="1.0" encoding="utf-8"?> <objectAnimator xmlns:android="http://schemas.android.com/apk/res/android" android:propertyName="translationX" android:valueFrom="-500" android:valueTo="0" android:duration="2000"> </objectAnimator>新增四個Button元件:<Button android:id="@+id/btnAlphaXml" android:layout_width="wrap_content" android:layout_height="wrap_content" android:background="#0000FF" android:text="Alpha XML" /> <Button android:id="@+id/btnScaleXml" android:layout_width="wrap_content" android:layout_height="wrap_content" android:background="#007000" android:text="Scale XML" /> <Button android:id="@+id/btnRotateXml" android:layout_width="wrap_content" android:layout_height="wrap_content" android:background="#A0A000" android:text="Rotate XML" /> <Button android:id="@+id/btnTransXml" android:layout_width="wrap_content" android:layout_height="wrap_content" android:background="#A000A0" android:text="Trans XML" />接著,在程式碼中載入建立好的XML Property Animation資源:// Alpha XML Button btnAlphaXml = (Button)findViewById(R.id.btnAlphaXml); btnAlphaXml.setOnClickListener(new OnClickListener() { @Override public void onClick(View v) { ObjectAnimator alphaObj = (ObjectAnimator)AnimatorInflater.loadAnimator(MyPropertyAnimation.this, R.animator.alpha); alphaObj.setTarget(v); alphaObj.start(); } }); // Scale XML Button btnScaleXml = (Button)findViewById(R.id.btnScaleXml); btnScaleXml.setOnClickListener(new OnClickListener() { @Override public void onClick(View v) { AnimatorSet scaleSet = (AnimatorSet)AnimatorInflater.loadAnimator(MyPropertyAnimation.this, R.animator.scale); scaleSet.setTarget(v); scaleSet.start(); } }); // Rotate XML Button btnRotateXml = (Button)findViewById(R.id.btnRotateXml); btnRotateXml.setOnClickListener(new OnClickListener() { @Override public void onClick(View v) { ObjectAnimator rotateObj = (ObjectAnimator)AnimatorInflater.loadAnimator(MyPropertyAnimation.this, R.animator.rotate); rotateObj.setTarget(v); rotateObj.start(); } }); // Translate XML Button btnTransXml = (Button)findViewById(R.id.btnTransXml); btnTransXml.setOnClickListener(new OnClickListener() { @Override public void onClick(View v) { ObjectAnimator transObj = (ObjectAnimator)AnimatorInflater.loadAnimator(MyPropertyAnimation.this, R.animator.translate); transObj.setTarget(v); transObj.start(); } });直接用程式碼建立
透過ObjectAnimator提供的靜態方法可以直接一行就建立出一個動畫物件,例如下面範例呼叫的是
ofFloat()方法,第一個參數是要被綁定動畫物件(如:Button),第二個參數是動畫名稱(支援的名稱列表如上面表格和XML的propertyName相同),第三個參數則是該動畫的起始值,第四個參數結束值,其作用由第二個參數動畫類型決定,最後呼叫ObjectAnimator.start()方法就可以開始啟動動畫效果。當然,setDuration()設定持續時間還是必要的。在Scale(縮放)範例裡,需要用到兩個ObjectAnimator物件來同時達到縮放寬和高的效果,這還必須借助
除了AnimatorSet的幫助,將兩個ObjectAnimator物件包起來同時生效,如果需要同時在加入其他效果,可以透過呼叫AnimatorSet.playTogether()方法同時加進去,playTogether()方法的參數數量並沒有限制,最後呼叫start()啟動動畫。playTogether()設定要合併的動畫之外,還有其它幾個設定順序的方法:playTogether() 設定要合併在一起的動畫效果,參數數量不限。 playSequentially() 設定要播放的動畫順序,參數數量不限。 play(), before(), after() 個別設定動畫播放順序的前後關係。 提示:在一開始介紹動畫時有提過,雖然Property Animation可以支援和View Animation相同的動畫特效,但是其不一樣的地方是,原有的View Animation動畫只是讓元件的外觀改變,而元件實際位置是不變的,但Property Animation則是讓該元件隨著動畫的狀態或位置跟著做改變,如當你使用View Animation移動一個按鈕的時候,雖然按鈕已經被移動了,但是當你要點擊按鈕的時候,你必須點擊原來的位置才會有效,而Property Animation則是隨著按鈕的移動,你必須去點擊目前按鈕的最新位置才有效。
在Activity.onCreate()方法內加入程式碼如下:// Alpha Code Button btnAlphaCode = (Button)findViewById(R.id.btnAlphaCode); btnAlphaCode.setOnClickListener(new OnClickListener() { @Override public void onClick(View v) { ObjectAnimator alphaObj = ObjectAnimator.ofFloat(v, "alpha", 0, 1); alphaObj.setDuration(2000); // 必須設定持續時間 alphaObj.start(); // 開始動畫 } }); // Scale Code Button btnScaleCode = (Button)findViewById(R.id.btnScaleCode); btnScaleCode.setOnClickListener(new OnClickListener() { @Override public void onClick(View v) { ObjectAnimator scaleX = ObjectAnimator.ofFloat(v, "scaleX", 0, 1); ObjectAnimator scaleY = ObjectAnimator.ofFloat(v, "scaleY", 0, 1); scaleX.setDuration(2000); // 必須設定持續時間 scaleY.setDuration(2000); // 必須設定持續時間 AnimatorSet set = new AnimatorSet(); set.playTogether(scaleX, scaleY); // 支援動態數量的方法 set.start(); // 開始動畫 } }); // Rotate Code Button btnRotateCode = (Button)findViewById(R.id.btnRotateCode); btnRotateCode.setOnClickListener(new OnClickListener() { @Override public void onClick(View v) { ObjectAnimator rotateObj = ObjectAnimator.ofFloat(v, "rotation", 0, 360); rotateObj.setDuration(2000); // 必須設定持續時間 rotateObj.start(); // 開始動畫 } }); // Translate Code Button btnTransCode = (Button)findViewById(R.id.btnTransCode); btnTransCode.setOnClickListener(new OnClickListener() { @Override public void onClick(View v) { ObjectAnimator transObj = ObjectAnimator.ofFloat(v, "translationX", 500, 0); transObj.setDuration(2000); // 必須設定持續時間 transObj.start(); // 開始動畫 } });
Animator傾聽器
在XML中建立一個Button用來播放動畫:<Button android:id="@+id/btnListener" android:layout_width="wrap_content" android:layout_height="wrap_content" android:layout_weight="1" android:background="#A04040" android:text="Listener" />用set準備一個要播放的動畫資源:
res/animator/set.xml<?xml version="1.0" encoding="utf-8"?> <set xmlns:android="http://schemas.android.com/apk/res/android" > <objectAnimator android:propertyName="alpha" android:valueFrom="0" android:valueTo="1" android:duration="2000"> </objectAnimator> <set> <objectAnimator android:propertyName="scaleX" android:valueFrom="0" android:valueTo="1" android:duration="2000"> </objectAnimator> <objectAnimator android:propertyName="scaleY" android:valueFrom="0" android:valueTo="1" android:duration="2000"> </objectAnimator> </set> <objectAnimator android:propertyName="rotation" android:valueFrom="0" android:valueTo="360" android:duration="2000"> </objectAnimator> <objectAnimator android:propertyName="translationX" android:valueFrom="-500" android:valueTo="0" android:duration="2000"> </objectAnimator> </set>透過ObjectAnimator.addListener()方法來加入AnimatorListener動畫傾聽器物件,該物件有四個方法,會在播放動畫時不同的時間點收到不同的事件:onAnimationStart(Animator) 動畫啟動時會收到。 onAnimationRepeat(Animator) 動畫重新開始時會收到。 onAnimationEnd(Animator) 動畫結束時會收到。 onAnimationCancel(Animator) 當呼叫 ObjectAnimator.cancel()取消動畫時會收到。// Listener Button btnListener = (Button)findViewById(R.id.btnListener); btnListener.setOnClickListener(new OnClickListener() { @Override public void onClick(View v) { //final AnimatorSet set = (AnimatorSet)AnimatorInflater.loadAnimator(MyPropertyAnimation.this, R.animator.set); ObjectAnimator rotateObj = (ObjectAnimator)AnimatorInflater.loadAnimator(MyPropertyAnimation.this, R.animator.rotate); rotateObj.setTarget(v); // 設定要播放動畫的元件 rotateObj.setRepeatCount(3); // 重複3次,也就是總共會看到4次動畫效果 rotateObj.setStartDelay(2000); // 啟動後要等待多久在開始動畫,單位:毫秒 rotateObj.start(); // 開始動畫 // 加入Animator傾聽器 rotateObj.addListener(new AnimatorListener() { int i = 0; // 紀錄repeat次數 @Override public void onAnimationStart(Animator animation) { Toast.makeText(MyPropertyAnimation.this, "Start", Toast.LENGTH_SHORT).show(); } @Override public void onAnimationRepeat(Animator animation) { Toast.makeText(MyPropertyAnimation.this, "Repeat: " + ++i, Toast.LENGTH_SHORT).show(); } @Override public void onAnimationEnd(Animator animation) { Toast.makeText(MyPropertyAnimation.this, "End", Toast.LENGTH_SHORT).show(); } @Override public void onAnimationCancel(Animator animation) { Toast.makeText(MyPropertyAnimation.this, "Cancel", Toast.LENGTH_SHORT).show(); } }); rotateObj.start(); } });使用Value Animator來實現不規律的動畫
準備一個Button和一個ImageView:<Button android:id="@+id/btnValueAnimator" android:layout_width="wrap_content" android:layout_height="wrap_content" android:background="#4040A0" android:text="ValueAnimator" /> <ImageView android:id="@+id/imgView" android:layout_width="match_parent" android:layout_height="match_parent" android:background="#00FF00"> </ImageView>因為顏色的強度變化以顏色值來說並不是連續性的數字變化,所以,如果要做到顏色變化的動畫,必須靠
ValueAnimator物件和AnimatorUpdateListener傾聽器,在這裡我們靠的是透過AnimatorUpdateListener傾聽器,在每個動畫的畫面要該變時,傾聽器方法onAnimationUpdate()方法都會被呼叫,我們可以藉由變化的數值來自行決定要改變的元件狀態,而不是透過動畫物件來幫我們改變元件的外觀。// Value Animator Button btnValueAni = (Button)findViewById(R.id.btnValueAnimator); btnValueAni.setOnClickListener(new OnClickListener() { @Override public void onClick(View v) { ValueAnimator va = ValueAnimator.ofInt(0xff, 0); // 255變化到0 va.setDuration(2000); va.addUpdateListener(new AnimatorUpdateListener() { @Override public void onAnimationUpdate(ValueAnimator animation) { int val = (Integer)animation.getAnimatedValue(); ((ImageView)findViewById(R.id.imgView)).setBackgroundColor(0xFF000000 | val << 8); } }); va.start(); } });